Three Dimensional Designs: How to Prepare Models
"In this article, I'm going to give you some insights into best practices with the actual printing of the models and how I look at 3D printing compared to illustration and 3D modeling."
All images © 2023 Mieke Roth
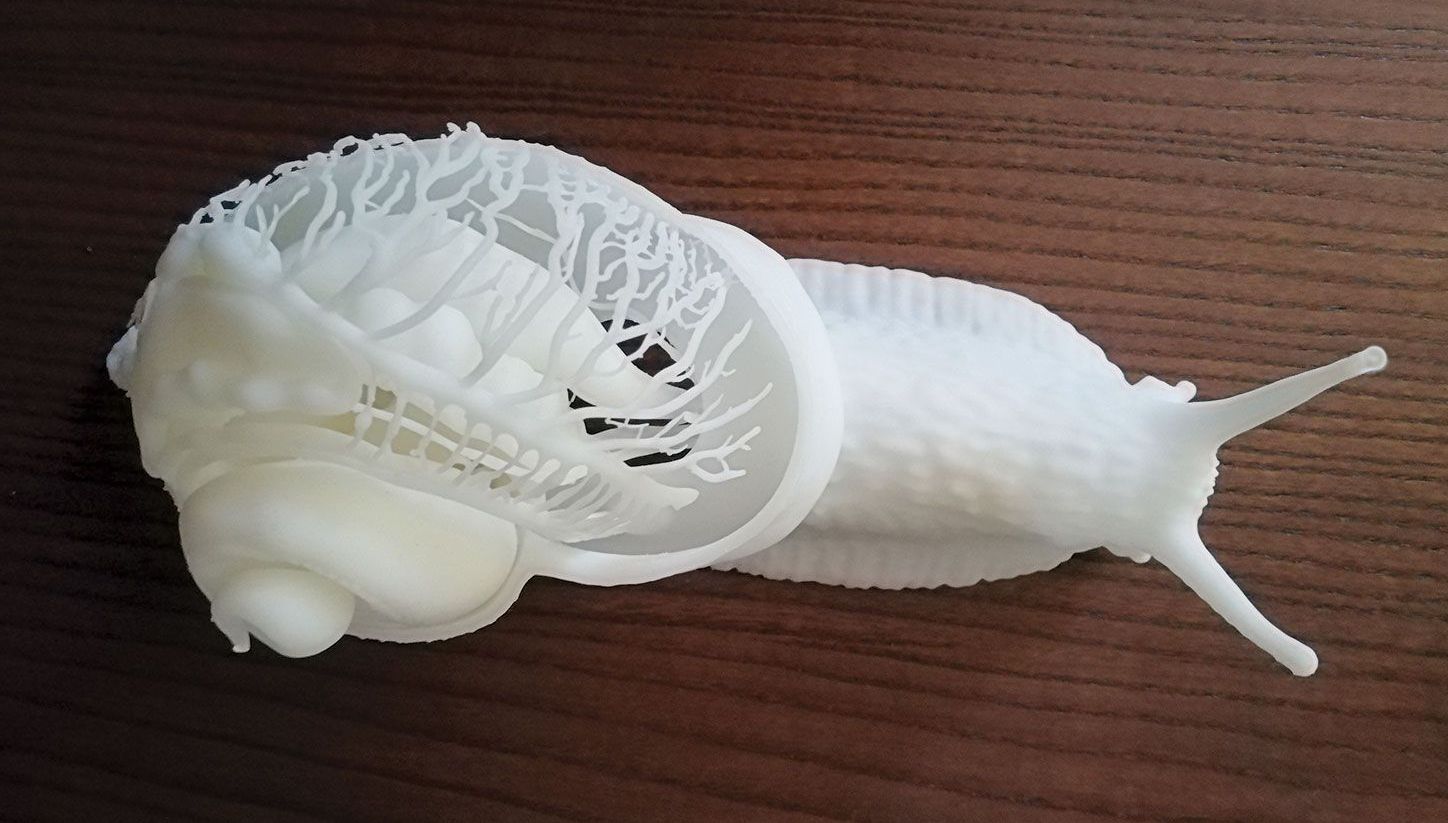
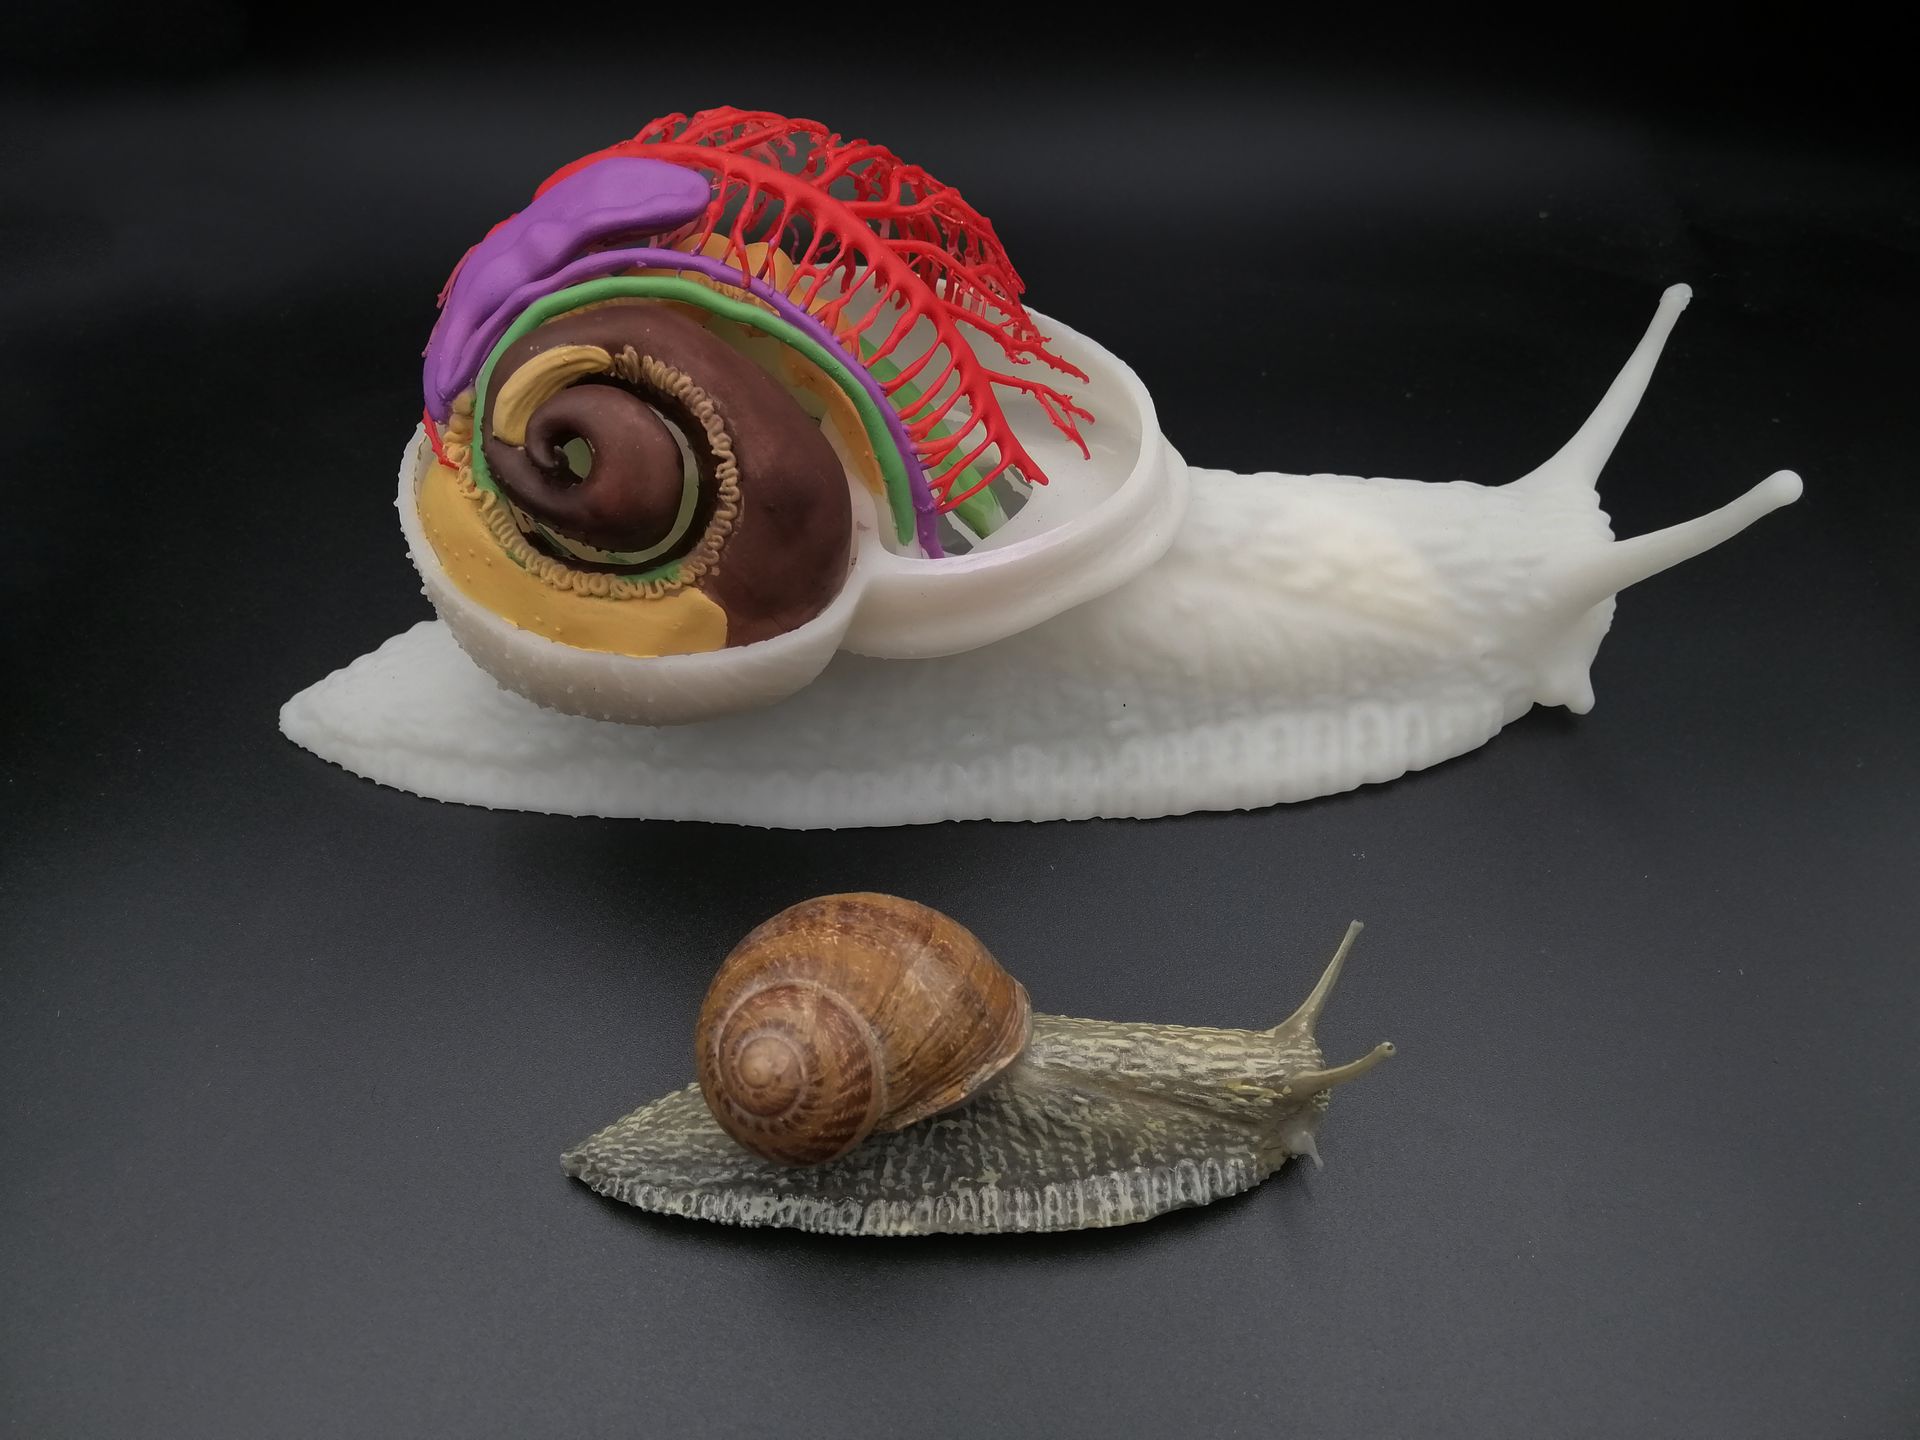
Figure 1: 3D Printed Snail.
In this article, I'm going to tell you a bit about how to optimize your models to get the most out of three-dimensional (3D) printing. I am not going to tell you about all the different printers out there or all the different techniques there are, because those things you can look up in abundance on the Internet. What I will do, however, is give you some insights into best practices with the actual printing of the models and how I look at 3D printing compared to illustration and 3D modeling.
There are two main types of 3D printing: resin printing and filament printing. Most of my experience is in resin printing. This is because the details in resin are crisp and layer lines are almost invisible, contrary to filament printing. A model printed with resin also feels more “real,” something I find important.
In the example shown above—my right-handed (by now, almost famous) anatomical snail—you can see that I didn’t 3D-print everything in the model (Fig. 1). Only the stuff that makes the model insightful. I removed half the shell and a lung to give people an understanding that they are still looking at a snail. Both the shell and lung are suggested by the shape of the rest of the structures—the organs follow the shell, and the veins follow the lining of the lung.
Filament printing has its advantages: it’s a lot cheaper, although that is changing rapidly. You can buy a 3D printer for as little as $100 (U.S. dollars) or as expensive as $40,000. The printers I am talking about are between $400 and $1,500. For most purposes, you don’t need to get more expensive than that.
Of course, if you print detailed structures, the model is more prone to damage. This is one of the reasons the current anatomy models are comparatively simple. But because you can 3D-print it yourself, you can always print a new one. So basically anything you can think of—plants, fossils, anatomy, or skeletons— can be 3D-printed. As with illustration, you can not only 3D-print an object as it is in natural life, but you can also show or hide structures for clarity.
The biggest advantage of 3D printing is, in my opinion, the fact that you can make stuff look realistic for people. It invites them to touch it, take it into their hands, turn it, and start investigating.
I have been 3D-printing since 2013 and have several printers. At this moment, only the Anycubic® resin printers are “live,” the rest are collecting dust. These Anycubic printers are affordable workhorses, and after an initial learning period, I only get perfect prints (Fig. 2). The bigger the printer gets, the more prone they are to users’ mistakes.
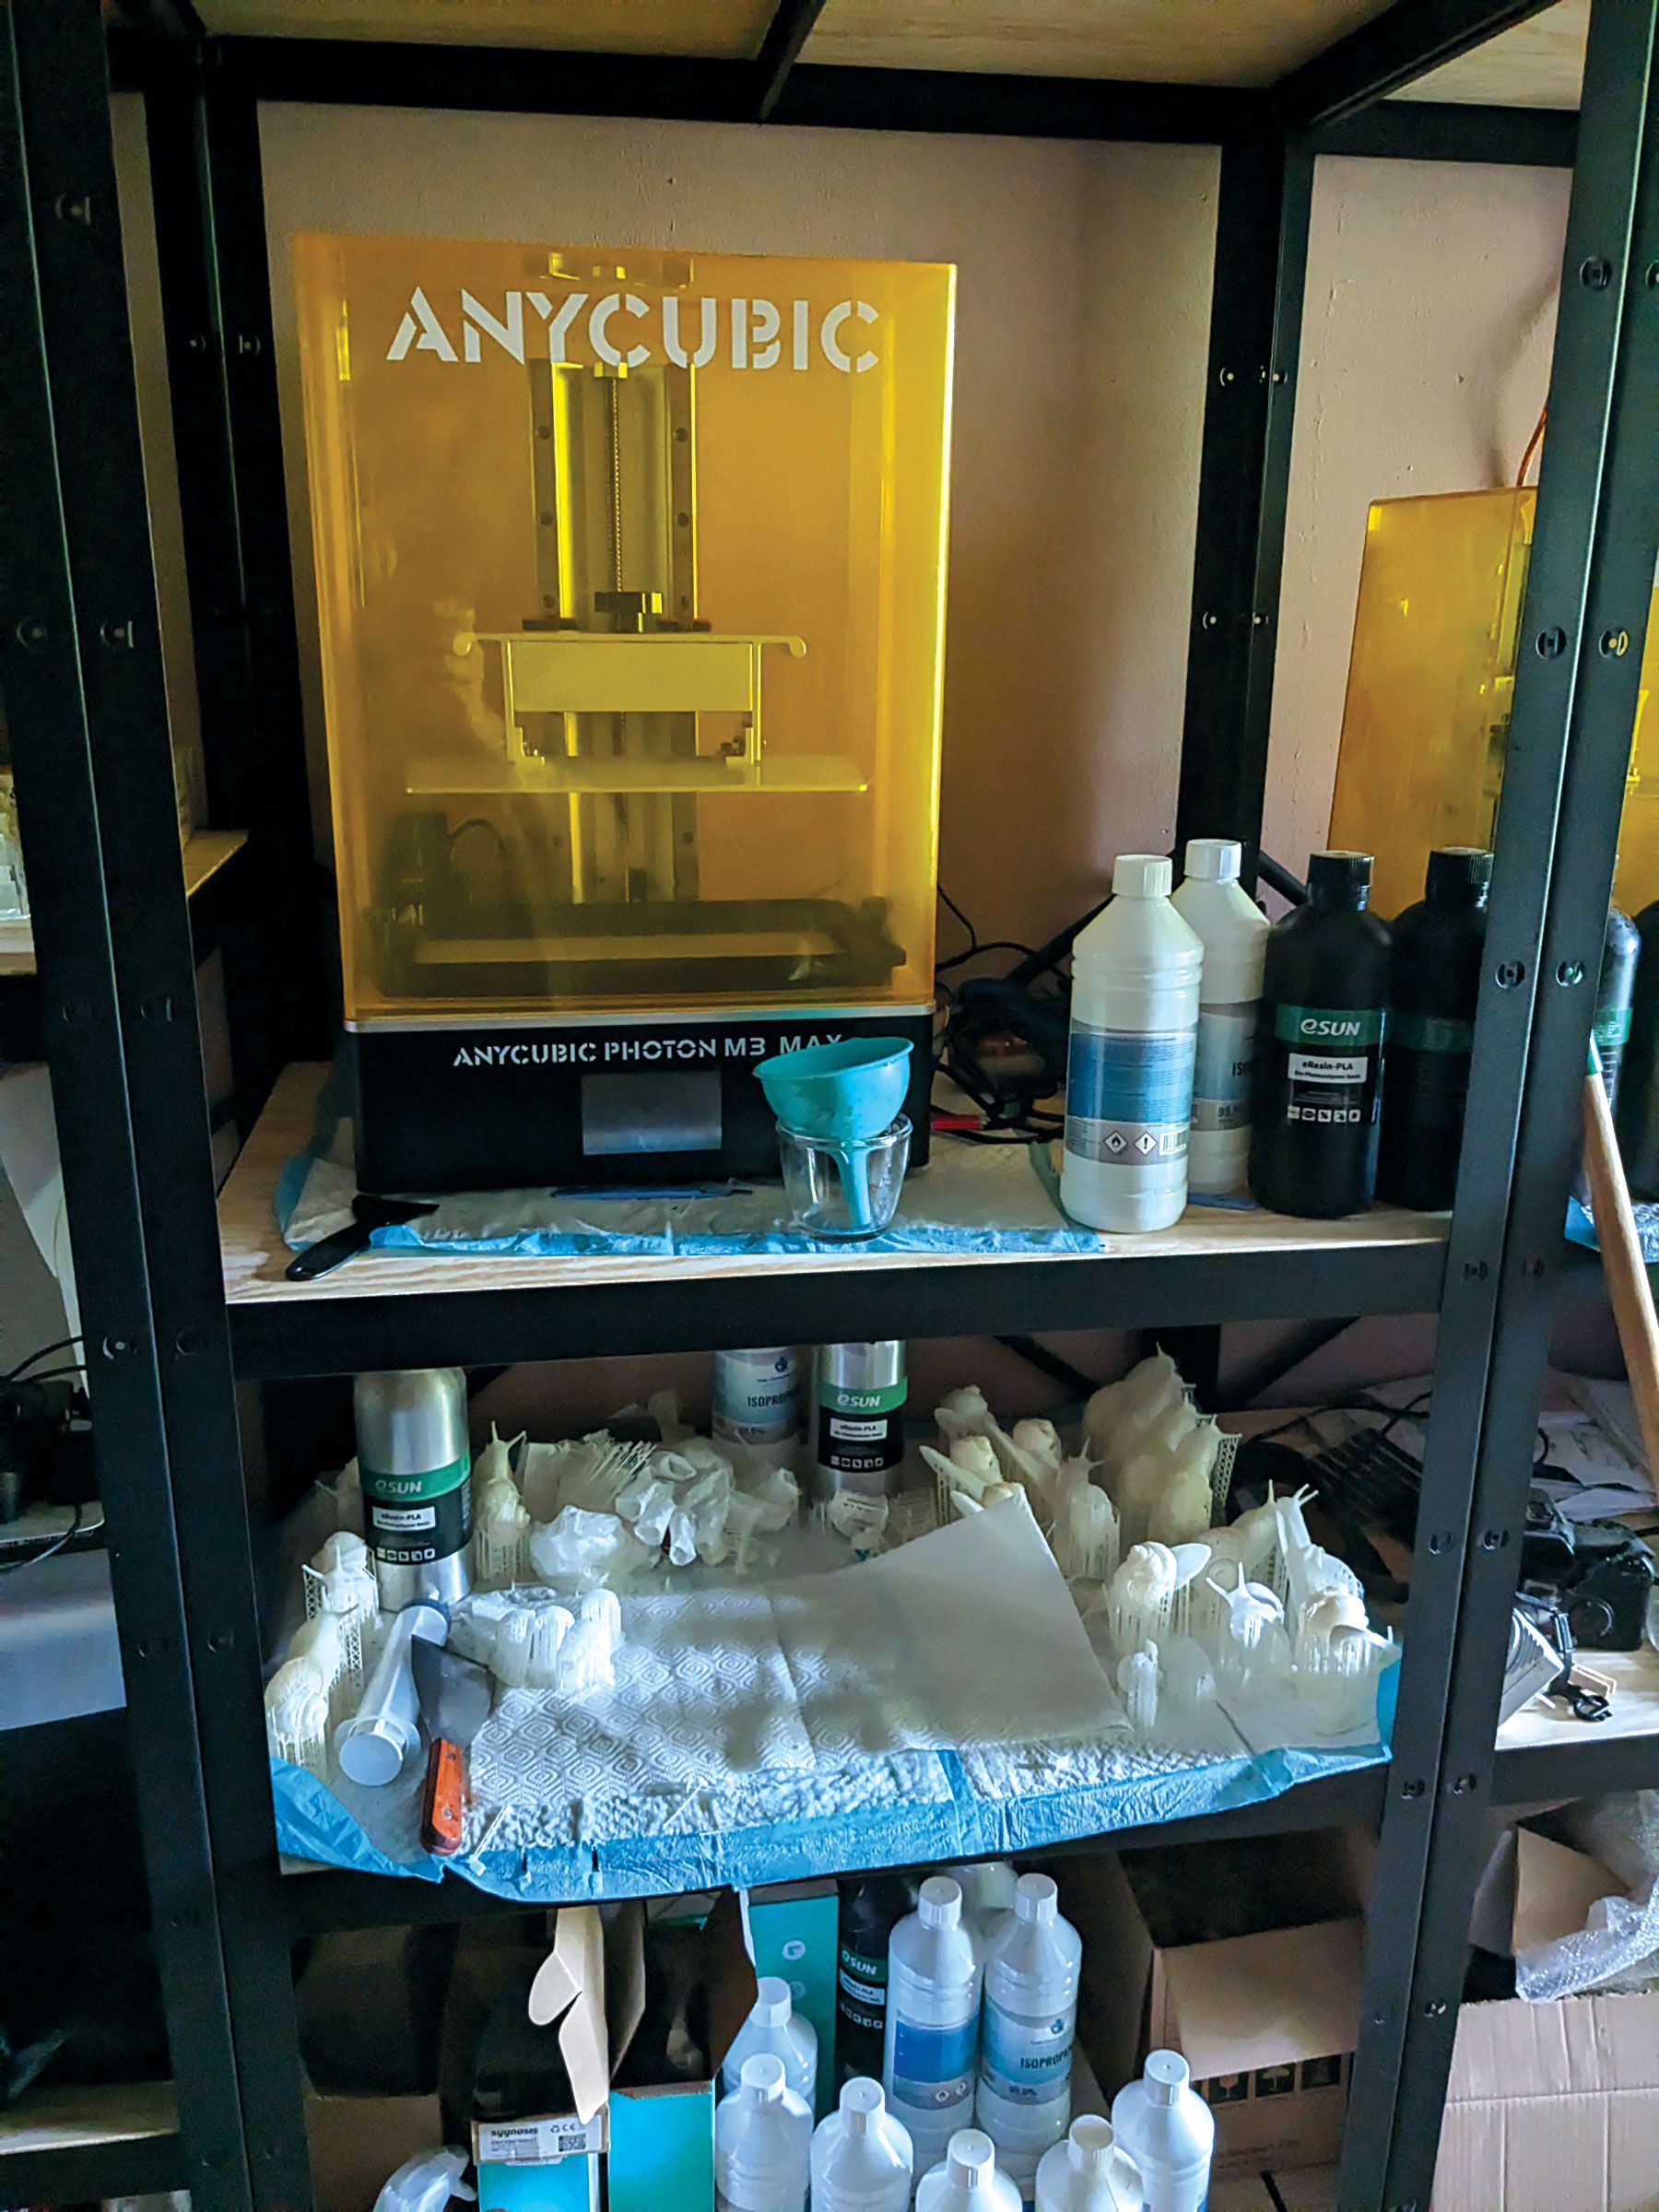
Figure 2: Printers and prototypes in the studio.
In the coming months, I will add two additional printers: a Rocket® 1 Pro, which uses a different technique than most 3D printers: instead of pulling the print out of the resin after exposing the bottom of the resin vat (Fig. 3), it prints by exposing the resin surface and sinking the print layer for layer down into the resin. It was a Kickstarter, so it’s going to be a gamble if the printer does what they claim, but if it does, it enables even more possibilities. Gravity is always an issue with 3D printing, especially resin printing.
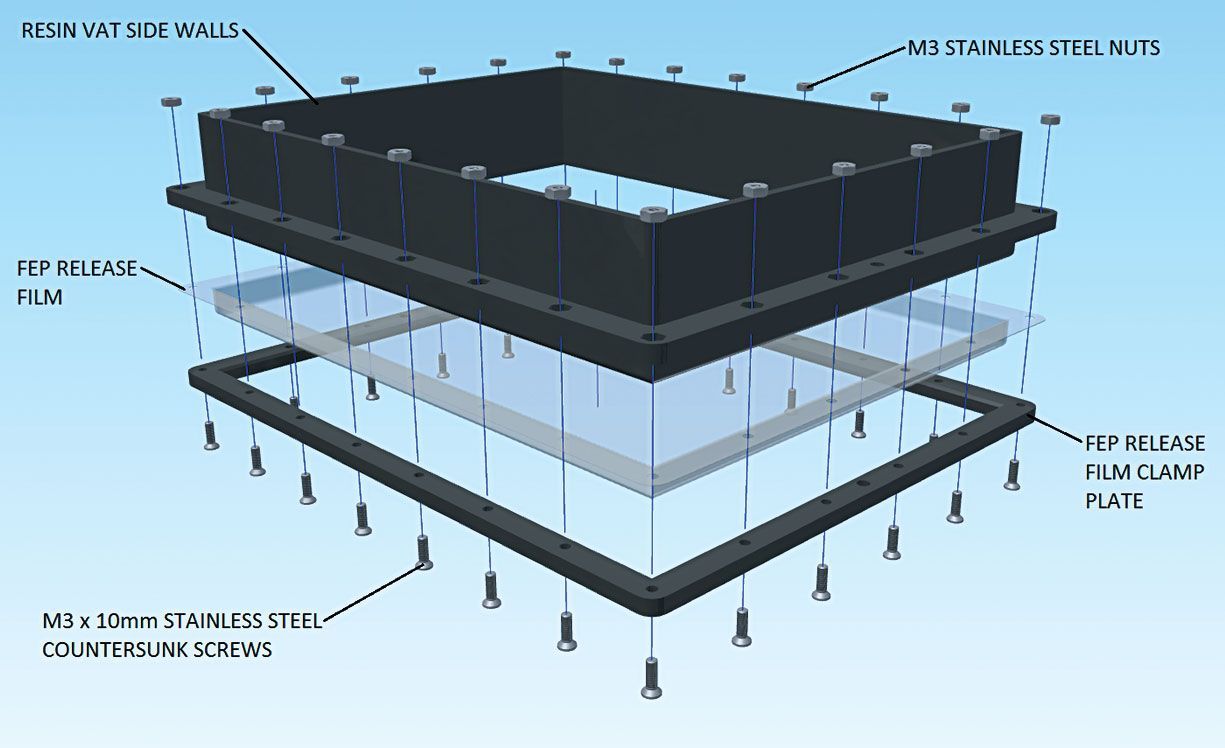
Figure 3: Example of standard vat construction where the resin-based 3D model is built from the bottom up using an FEP (fluorinated ethylene propylene) film as "table" where each layer of the model is printed. This is one of the common failure points in 3D resin printing.
The other printer is a Bambu® Lab X1 Carbon. This is my first filament printer in years, and it also came out of a Kickstarter. But this one is different: instead of using the Kickstarter campaign to develop a product, Bambu used it to market theirs.
There are already loads of Lab X1 printers in the field, and as a result there are a lot of people with experience using them. This printer is “plug-and-play” and is extremely fast for a filament printer. I will use this printer to experiment with detailed prints also, but I especially bought it because I can print in different colors with it. As with resin printing, I will experiment with it and stretch the limits of this printer too.
To be able to 3D-print a model, you need special software to prepare it. These are called “slicing applications.” What they do is cut your model into very thin slices. With filament printing, those slices are then interpreted and made into “walls” of a certain thickness—basically the outside of the model and an infill. The infill is there to make the finished model firm.
The reason for this is that the slicer app makes black-and-white images of each layer. (The white is what is getting printed.) If there's a hole in your model like I show you below
(Fig. 4), the slicer doesn’t know what to make white. So, make sure your model is clean and solid. Digital 3D models are 2D surfaces shaped in a 3D form. There is no actual way to do it differently than this. To be able to distinguish the inside from the outside, your model needs to be one complete surface without any intersections or holes. So, if, for example, you want to print a model that is made up out of different objects in one go, you need to make sure that the objects don’t intersect or are fused to form one object. This is easily done in ZBrush. For example, use Dynamesh® and set the resolution high enough for the objects to fuse and the details to still show. ZBrush also has a function where you can check the mesh volume. This is a very handy function because it makes sure the model is completely solid.
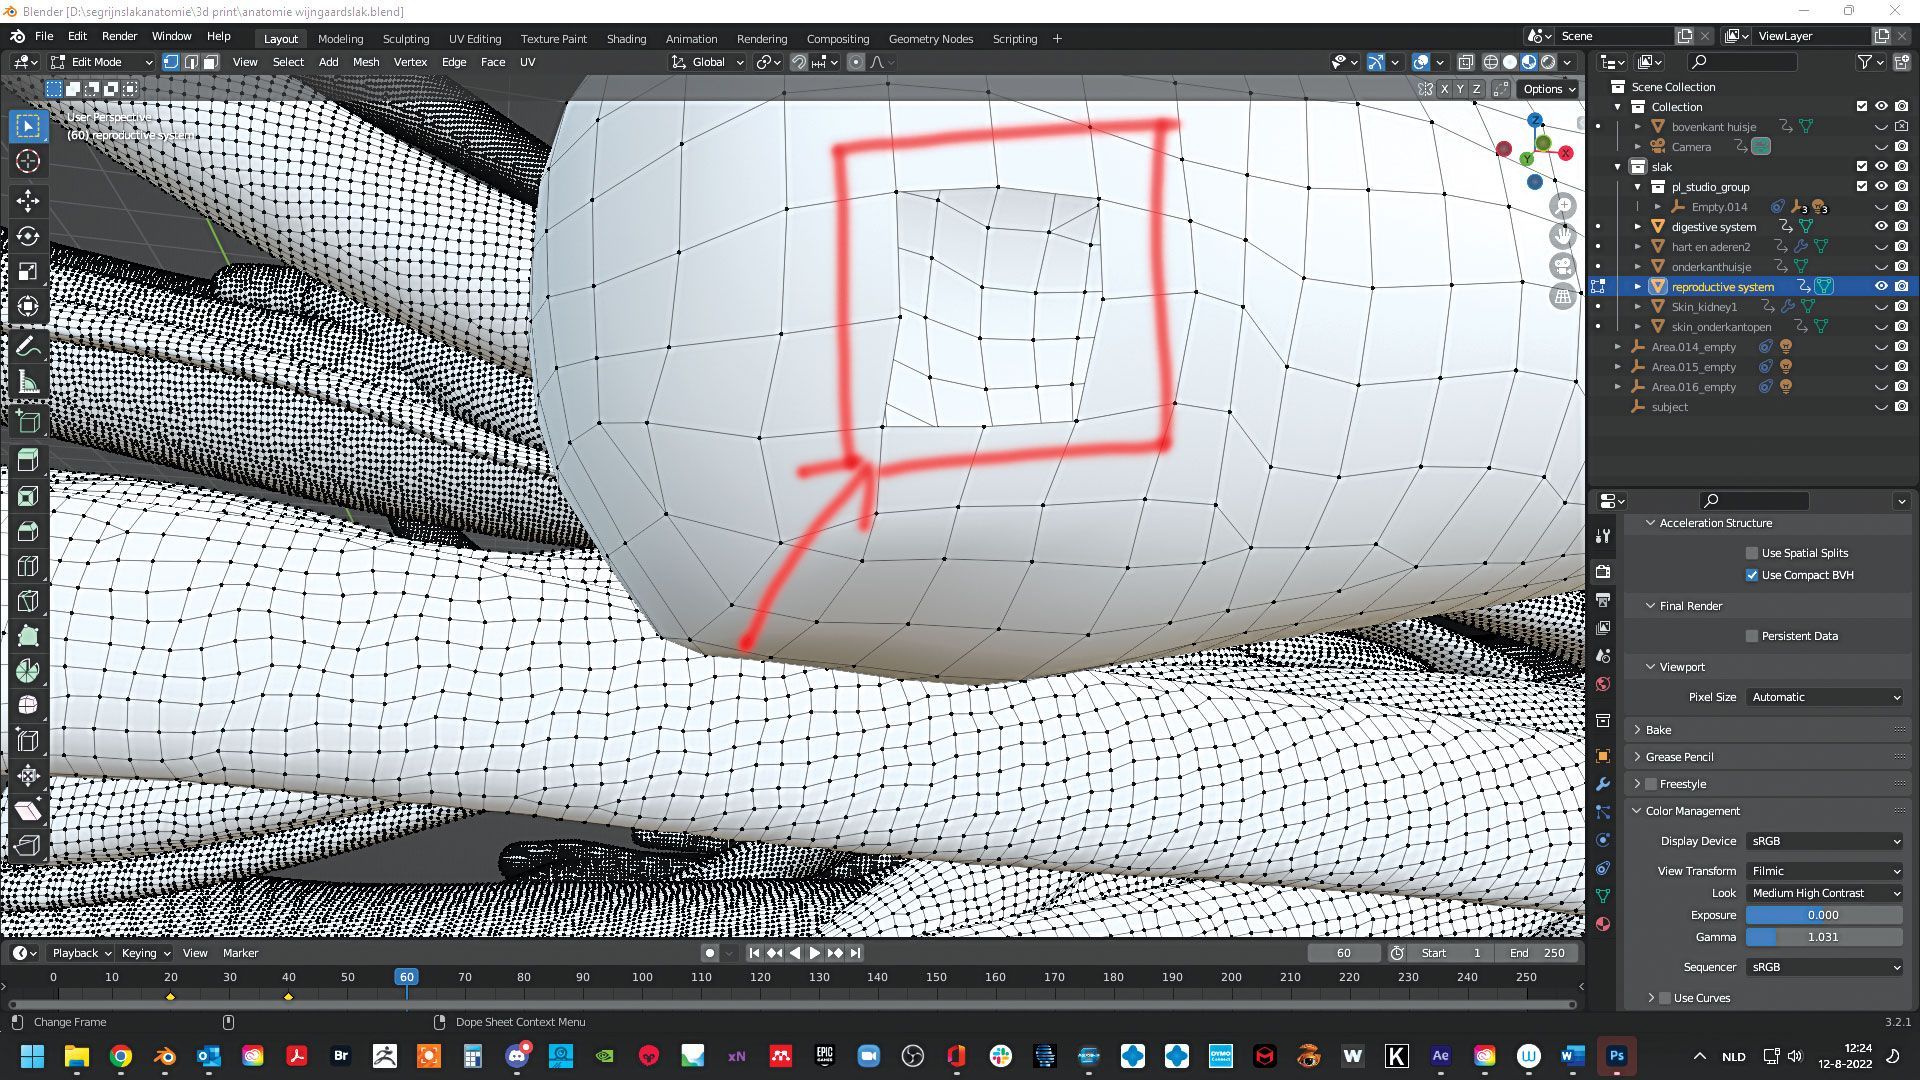
Figure 4: Hole in model shown in vector drawing in ZBrush.
Once you have optimized your model, you can export it. Most people export it as an STL file, but a lot of slicers can also handle OBJs, which are the preferred file format for 3D color printing. What you choose all depends on your preference. What I have encountered is that ZBrush doesn’t give a clear size to models. Often, I need to go through Blender® 3D modeler to give a model a proper size and even then, the slicer application still can have a problem with that. Even though that does not always happen, it’s something to consider. I solve that by noting the size I make it in the slicer and noting the amount I scale it. This way I’m sure everything fits if I print a model with separate parts, or if I want to redo the model for some reason.
Now that you are in the slicer application, you need to be aware of how a resin printer works. It fuses very thin layers of solidified resin. While printing, the resin will stick to parts of the model that are faced toward the build plate. This resin will partly solidify, making the details on that part of the model blur or even disappear. There will always be parts of the model that are faced to the build plate, so one of the most important things in getting a great print is how you position the model on the build plate.
To make matters more complicated, the larger the surface area that needs to be exposed per layer, the bigger the forces are on the model, making it prone to failure. Luckily, those two restrictions mostly have the same solution: which is to angle the model in such a way that the surface per layer is as small as possible, best accomplished by angling flat surfaces to the build plate. This enables the resin to slide off the model as much as possible. If you also want to minimize the visibility of the layers, most of the time an angle of 45° is somewhat okay for a layer height of 50 μm, which is the layer height mostly used in 3D printing. If very smooth surfaces are an issue, you need to calculate the Arctan for your specific printer. A video at the following link will explain how you do that: https://youtu.be/Qs2Rb0ExnIM .
Next, you can add supports to your model. The supports make sure your model is printed as you want it to print without distortion. The slicer app will calculate overhangs and most of the time the default settings are good enough to start with. Make sure you use the right thickness for the right model: tiny models need thin supports, and of course, larger models need thicker supports. If you use the default settings to add supports, make sure they aren’t too close together. Remove the ones that are too close, so you get a nice and even support “forest” (Fig. 5).
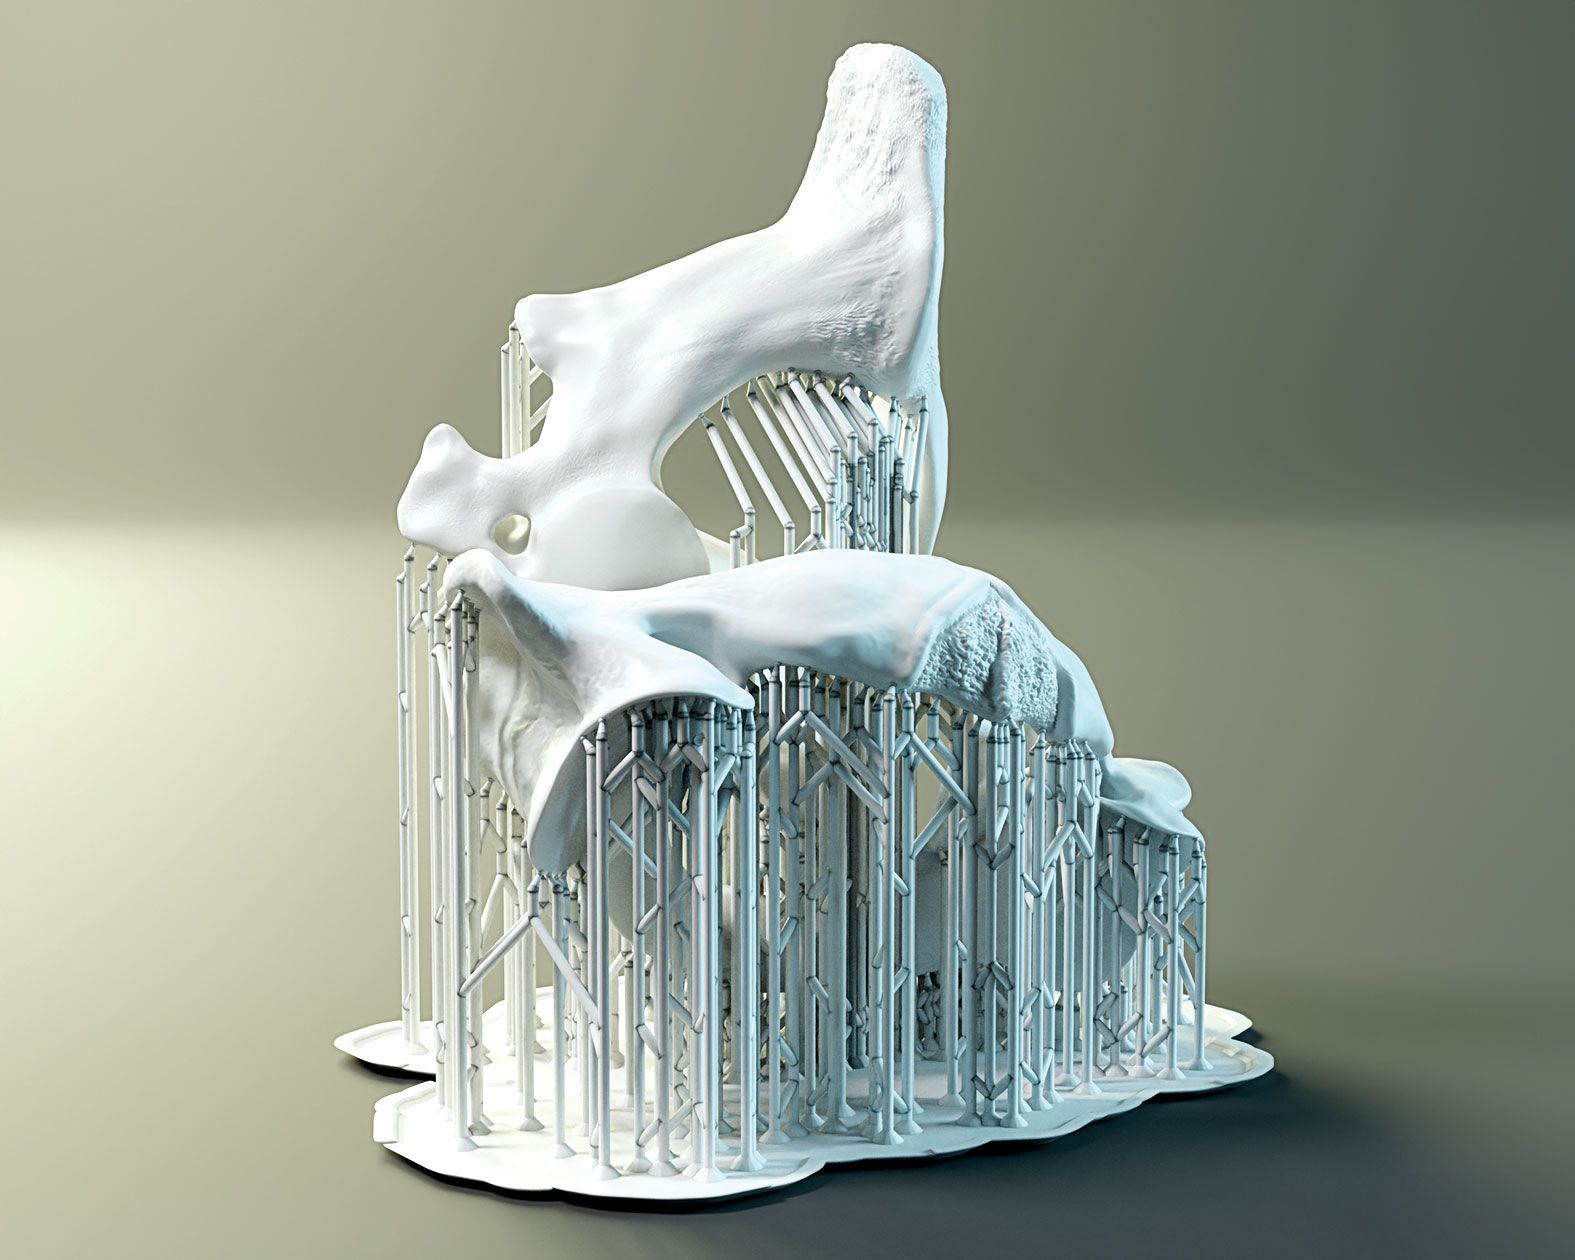
Figure 5: Model C1 C2 with supports.
Having done all that, you need to make sure you have the right exposure time for your resin. The best way to figure that out is to use a calibration model. The best one I have found so far is the Ameralabs® Town (Fig. 6), which can be found on this blog: https://ameralabs.com/blog/3d-printer-calibration-part/.The blog gives you everything you need to know on how to interpret the model once you print it. You will probably need to do this several times with different exposure times. The best way is to start with the recommended exposure time for the resin you are using, and then go up or down in time depending on what you see when you print the calibration model.
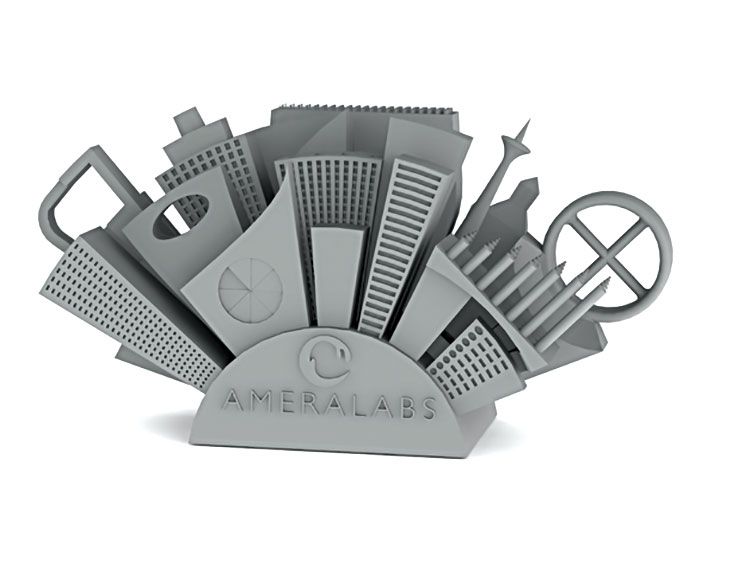
Figure 6: Ameralabs calibration model. Image by Ameralabs.com
Now you are ready to put this value into your slicer application for that resin. Here are my recommended slicer settings for the Anycubic Mono X with Esun® plant-based white resin. First I make sure the speeds aren’t too high. Most of the time a slicer has a lot higher default settings, but those are prone to failure.
Second, it is better is to start with a low exposure and work your way up. This video, https://youtu.be/zO5DxVGWxXs gives good insight into what slicer settings do and why.
For me, 3D prints make science education much more interactive and a lot more accessible. It is relatively simple to get models out there and let students print them themselves. You don’t have to worry that a model breaks because you can print it again and again. It enables you to show stuff that isn’t easily explained in text or illustrations. Having said that, I approach 3D printing in a similar way to illustration. Because I can choose what to show and how to show it, I can make models both insightful and beautiful.
Even though 3D printing is a technique that has existed for decades, the evolution of the techniques is going at an astonishing rate. There are now 3D printers that can print objects in the same number of colors as you do with printing illustrations in magazines and such. The prices of those printers are still in the tens of thousands of dollars and the time it takes to print a relatively small object is insane, but affordable full-color 3D printers should become a reality in a matter of years.
In conclusion, I hope you can see that recent advances in 3D printing enable a new path for many illustrators to explore science education by enhancing interactivity and accessibility. 3D printing presents an intriguing opportunity for students, the general public, and even science colleagues to communicate complex concepts that are challenging to explain through text or a single image. The rapidly evolving nature of 3D printing techniques, with the promise of affordable full–color printers in the near future, suggest an exciting future for anyone ready to explore 3D art.
Mieke Roth is an animal scientist and information architect who now specializes in animal anatomy, in addition client work in the visual sciences. Her work is internationally recognized by both scientists and my scientific visualization colleagues. Mieke uses the latest techniques as much as possible in her work making anatomical 3d models processed into very accessible interactive apps that make learning anatomy fun. See more of her work at www.miekeroth.com.
Share this post: